You will require the following items
- My Arm kit (Acrylic Assembly with 4 DC geared BO motors)
- 4 Motor-direction-control switch (3 Way, 6 terminal switch)
- 9v Battery
- 9v Battery connector
- 8-core rainbow wire strip (2 mtr.)
MY Arm kit contains all above required items.
Step 2: Connect wire with 4 motors
Connect/solder the 8-core rainbow wire with 4 motors of MY Arm. Each motor have 2 terminals, hence 4 motors have 8 terminals so connect them with 8 wires of rainbow wire strip.
Please note that gripper motor will be little far away from other motors, so the wire you connect with this motor should be longer.
Step 3: Build the ‘My Arm’
Follow the simple instructions described in the assembly manual (provided with every MY Arm kit) to build your ‘MY Arm’.
Step 4: Connections
Connect MY Arm motors, Slide switches and battery as shown in the connection diagram.
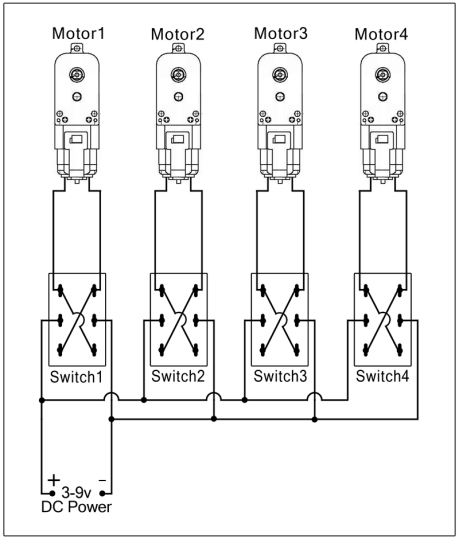
Note: You can also use big DPDT switches with same connection diagram and you can also use different battery/power supply according to your project/use. You can use 3 to 9v DC supply/battery. Lower voltage (i.e. 3v DC) will result in slow movement of arm. 6v DC is the best suitable voltage for medium speed and smoother control of MY Arm.
Step 5: Congratulations! You are done, Enjoy!
High five! You have done all steps successfully, now its time to test and control your MY Arm with the connected switches. You can fix these switches and battery in a box for better looking and comfort.
Have fun with your robotic arm.
Buy MY Arm kit from amazon here
If you are facing any difficulty or have any suggestion or feedback, please write us at expetechnologies@gmail.com
Comment & share if you liked the tutorial.